Introduction
To use PsychoPy, the program needs to be downloaded. This can be done at https://www.psychopy.org/
General Settings

In the top bar, regardless of the window, there is a gear icon that leads to the settings. Many settings for the entire experiment can be changed there. However, the 'Experiment info' section, found under 'Basic', is particularly important; it's the table at the very bottom. Here you can determine which information is supposed to be collected at the start of the experiment. In the left column 'Field', you enter the name of the variable, and initially, it often says 'session' among other things. In the right column, you enter a default value, which is the value that will be saved if you don't enter a specific value at the start of the experiment. You can add as many variables as you want, but you cannot remove as many as you want. The variable 'participant' is mandatory; if you delete it, the experiment will not work.
Builder: Flow, Routine, Component
The Builder is essentially divided into three areas: the component area on the right, the routine area on the left, and the flow area at the bottom.
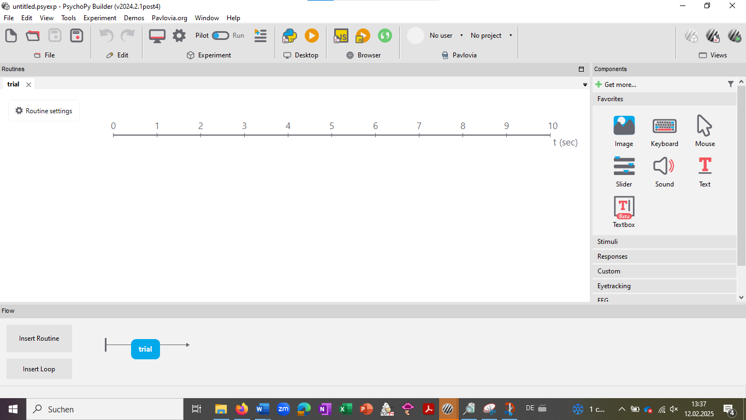
The flow is the entire experiment. It consists of different sections, the routines. A routine could, for example, be used to display a message that the experiment has started or to show a word while a response is recorded via keyboard. In turn, a routine consists of various components, each taking on a subtask. Taking as an example the routine that should show a word while a response is expected via keyboard: In this case, you would use a text component and a keyboard component. The text component would then have the task of showing the text, i.e., the word, while the keyboard component would have to wait for the response via keyboard, react to it, and save it.
When you click on an icon in the component area, a component is inserted into the routine area. The routine, in turn, is displayed in the flow area at the bottom. To create a new routine, you need to click on 'Insert Routine' in the flow area and choose the point in the flow area where the routine should be placed. When you click on a routine, it is displayed.
How can you edit a component?
To edit the inserted component, you need to click on the component.
Then a window with the component-specific settings opens. You can (and sometimes need to) select a start and endpoint. This can be a time in seconds, a frame of the experiment, or a condition. For all components visible to the participant in the experiment, like text or images, you can also adjust their size and position, sometimes even their color. This is usually possible in the Layout, Appearance, or Formatting sections.
Almost every component has the 'Data' section in the settings. What you can set there varies slightly depending on the component. However, it always concerns the values that should be stored for the component during the experiment. An example is the time when the component started in the experiment and when it ended.
There is also always the 'Testing' section. It is especially useful because you can temporarily disable a component there without deleting it or changing its settings. This is particularly helpful if you only want to execute individual parts of a routine.
Depending on the component, there are other, more specific settings that are explained later when the respective component is explained.
What components are there?
Text Component and Textbox Component
Both components are used to display text. Therefore, they are often used to display instructions or stimuli. However, there are some differences, which is why it can be wiser to use one component instead of the other in some cases.
The text component is more suitable for displaying a short, static text. Additionally, it is precise to the millisecond, making it work better if you want to show or remove a text very quickly.
The textbox component, on the other hand, offers the advantage of automatically wrapping text, making it suitable for long texts. You can also type in the textbox during the experiment if this function is allowed when creating the experiment. This way, the participant can, if desired, enter text during the experiment.
Special settings for the text and textbox components are mainly the settings for text formatting. In addition to regular settings like font size, you can also set the language direction (left to right, right to left, Arabic). For the textbox component, you can select whether the text should be editable.
The text to be displayed needs to be entered in the 'Basic' field for both components.
Polygon Component
The polygon component displays a symbol that you need to choose yourself. It is often used to display a fixation cross, but you can also choose other shapes, like a triangle. Here, too, you can adjust the color, size, and position.
Keyboard Component
The keyboard component enables the use of the keyboard. It is not needed to enter something in a textbox component. Instead, it is mainly used to provide an answer. For example, in a lexical decision task, you might press 'j' to say that something is a word and 'f' to say that something is not a word.
In the keyboard component, you can specify under 'Basic' which keys are allowed to be pressed. You always need to put the name of the key in quotation marks (e.g., 'a'). If you don't specify anything, any key can be pressed. For the example just given (the LDT), it would make sense to specify 'j' and 'f', because otherwise keys that are not available could also be saved as an answer.
Another important function also found under 'Basic' is 'Force End of Routine'. If this option is selected, the whole routine ends as soon as a key is pressed on the keyboard. This would also make sense for the LDT, as you want it to move on immediately after giving the answer. In this case, no endpoints for the displayed stimulus and the keyboard component need to be specified: they run as long as the routine runs.
Under 'Data', there is also the option to choose which keystroke should be saved (the last, the first, every, or none). Additionally, you can also save whether the given answer is correct. Of course, you need to specify the correct answer.
The mouse component allows the use of the mouse. Under 'Basic', you can indicate under 'Clickable Stimuli' which objects should be clickable. You need to enter the name of the component; on the other hand, you can specify under 'End Routine On Press' what type of click should end the routine. Of course, you don't have to use 'End Routine On Press'.
Under 'Data', you can specify whether the 'Mouse State' should be saved only at the end, on a click, on a valid click, for every frame, or not at all.
It is important to select 'Show Mouse' in the general settings of the experiment. Otherwise, the mouse exists but is not visible.
A slider is a scale on which a response option can be selected. You can set it under 'Basic' at 'Styles' in various ways. These are explained in the table in the image.
 Table created by Lara von Dombrowski
In addition to the response options 'Ticks' (need to be numbers), you can also enter labels for the response options under 'Labels'.
Initially, 'Ticks' often says 1,2,3,4,5. This means there are five evenly distributed response options. However, you don't have to work with continuous numbers. You could also enter 1,2,3,5, for example. In this case, the response options 1,2,3 would be more to the left, then there would be a larger gap, and on the right would be the response option 5, even though there are only four response options in total.
Image Component
The image component is used to display an image. For this purpose, the file path of the image needs to be specified at the very bottom under 'Basic'. You can use either the absolute file path or the relative file path (starting from the experiment file). Alternatively, you can search for the file to be used by clicking on the folder icon.
Button Component
The button component is a button in the experiment. Here, too, 'Force End of Routine' can be selected. Additionally, you can edit the text displayed on the button, and you can insert a 'Callback Function'. This is code that should be executed when the button is pressed by the participant.
Sound Component
The sound component is used to play a sound. This sound needs to be specified under 'Basic' at 'Sound'. You can use the name of a note or a frequency or the file path of an audio file. In any case, an endpoint needs to be specified here, even if the audio file has a limited length.
Under 'Device', you can specify the speaker to be used.
Microphone Component
With the microphone component, recordings can be made during the experiment. Here, too, you can specify under 'Device' which device should be used. Under 'Data', you can also specify the file type in which the recording should be output. There is also a transcription function. However, it works with Google and costs money.
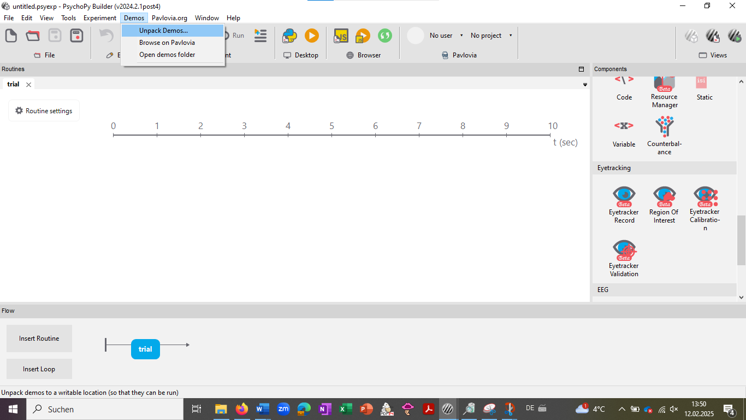
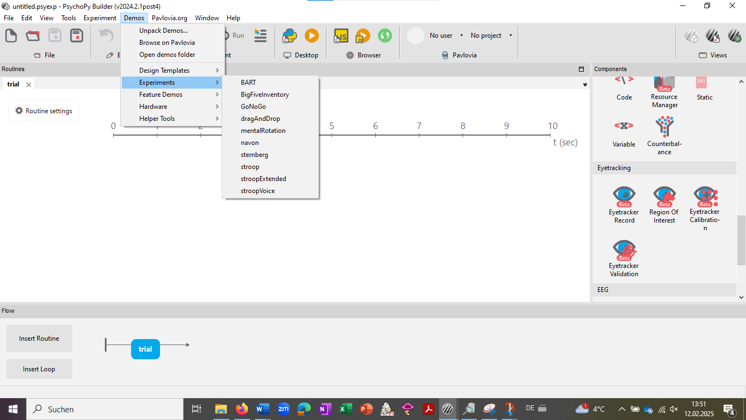
Demos
To test PsychoPy, the demo experiments included in the program are well-suited. You can find them in the top bar under 'Demos' and then under 'Experiments'. Before the first use, the demos need to be unpacked first ('Unpack Demos'). Besides these demos included in the program, there are additional demos on the PsychoPy website.
Conditions File
A conditions file is needed in most cases. A conditions file is created with Excel and stores the conditions for each run (explained below under loops). For example, in an LDT, the target word in one run might be 'Tree' and in the next run 'Sichsu'. You can also store file paths in a conditions file. This makes sense, for example, if a different image should be shown or a different sound should be played each time. You can also enter values that the experiment does not need later, but which help you keep track.
Loops and Variables
To loop through a conditions file, a loop needs to be used. This can be created in the builder in the flow area with 'Insert Loop'. Then you have to specify which routine(s) it should be placed around, i.e., which routines of the experiment should be repeated. You usually want to repeat routines like a stimulus display, rather than something like a welcome message.
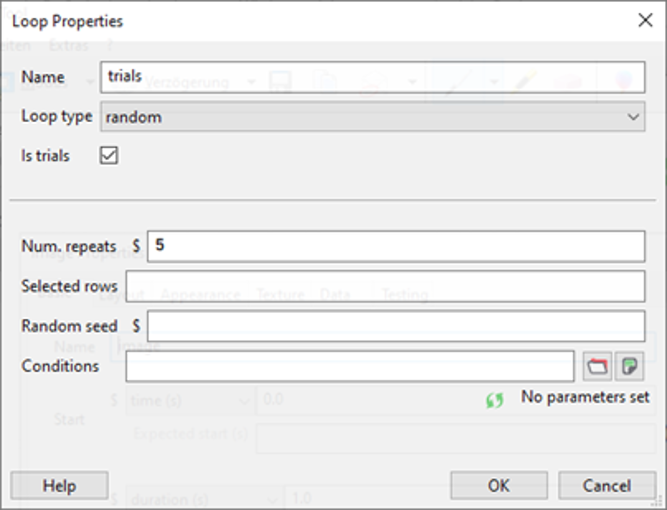
The conditions file is then specified at the very bottom under 'Conditions'. However, you can also edit many other settings, such as how often the conditions file should be looped through.
An important setting is 'Loop type'. Here you have the choice between five options, but the most important are:
- Random: The conditions file is looped through in a random order
- : The conditions file is looped through from top to bottom
By using a loop, the columns of the conditions file become variables usable in PsychoPy. The names of these variables are indicated at the bottom in the loop window after selecting the conditions file. Now you can use these variables to change the target word in each run, for example. Let's take the LDT example from earlier: The target word in one run is 'Tree' and in the next run 'Sichsu'. The two words would then be in a column in the conditions file that might be called 'target'. If you now enter '$target' in the text field of the text or textbox component and select 'set every repeat' to the right of it instead of 'constant', a different word from the 'target' column in the conditions file is displayed in each run.
The '$' needs to precede the variable name in PsychoPy. It marks the variable name as code. Strictly speaking, the variable name is already Python code. Of course, you don't have to do this when working in the coder.
Running the Experiment
To run an experiment after creating it, click on the start icon above the desktop. Under 'Experiment', however, you can still set whether the experiment should only be run as a pilot ('Pilot') or actually ('Run').
In 'Pilot', the experiment appears in a small window, in 'Run' it is displayed on the entire screen. In both cases, the experiment can be aborted with the Escape key.
Evaluation
When an experiment is run, a new folder called 'data' is created on the computer in the folder where the experiment file is located. After a run, a CSV file is saved there, which contains the saved data. If a microphone component was used, audio files with the recordings are also saved there.
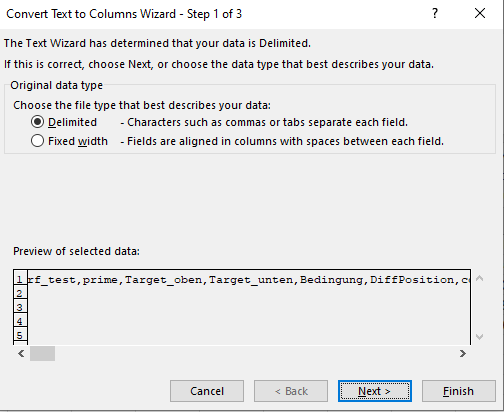
The CSV file can be read with Excel, but it is initially in a poorly readable state. To change this, you have to convert it to an XLSX file.
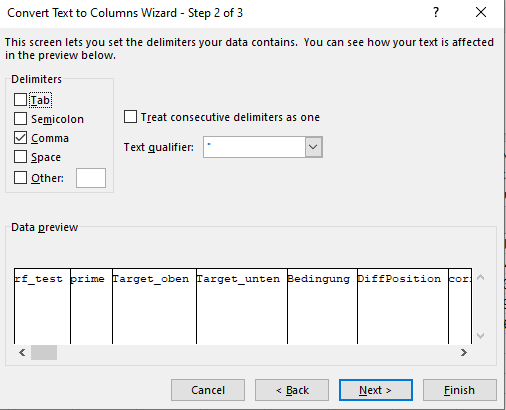
Sometimes the need for this is automatically recognized by Excel. A window with a text conversion wizard then appears. If this does not happen, proceed as follows: First mark the entire first column in Excel. Then go to 'Data' in the top bar and select 'Text to Columns'. In the new window, select 'Delimited' and click 'Next'. In the second step, select 'Comma' instead of 'Tab' and click 'Next'. Then you can click 'Finish'. Now the files are in a readable format.
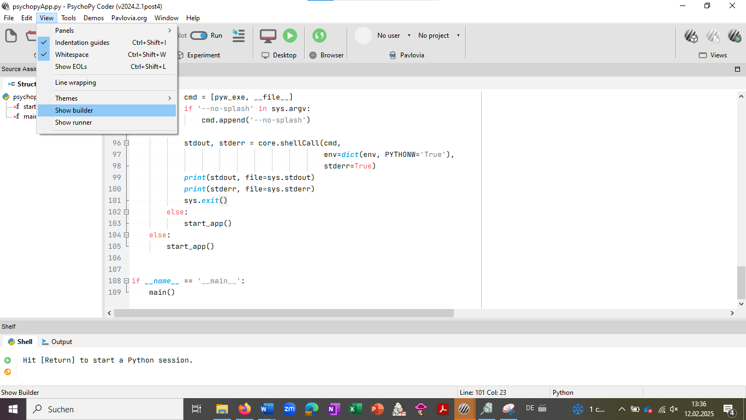
Coding for Special Functions
For some special functions, it is essential to use code. If you still want to use the builder, you could first create a large part of the experiment in the builder and then transfer the experiment to the coder. This can be done in the top bar above 'desktop' by clicking on the left of the two icons (contains the Python logo). This converts the builder, i.e., a psyexp file, into a coder, i.e., a py file. This is an irreversible process.
However, it is often also possible to use the code component. In it, you can program special functions that are then inserted into the Python script. This allows you to access all variables that exist in the Python script, even if you cannot select them via a component. You can also determine the position of the code snippet in the Python script.
'Special functions' include not quite so special functions, such as adjusting text based on a previous response. For example, it might be that the instructions differ for left- and right-handers, meaning different keys need to be pressed. To design the instruction text accordingly, it is necessary to program.
For some common use cases, we have prepared builder files that already contain corresponding code components. This way, you can practically build around the code in the builder and use the special function without having to program it yourself. You can find the files on the bottom of the page.
- Left-right condition: Handedness, the case just mentioned
- Use of several different conditions files: if you want to give different subjects the same experiment with different stimuli, i.e., different conditions files, which you want to select at the beginning of the experiment.
- Conversion of slider responses to labels: In the evaluation file, instead of the numerical value of the response on the slider, the response is displayed as a label
Further Information
Of course, there are other components and functions. However, since this guide is intended to provide a first insight into PsychoPy, not everything is covered. There are other sources that cover more aspects.
- https://katalogplus.ub.uni-bielefeld.de/Record/991024604359706442?sid=57829725
- https://katalogplus.ub.uni-bielefeld.de/Record/991025968740706442?sid=57829725
There is also another guide from chapter 10 in 'The Hitchhiker’s Guide to PSGY1001' by Jan Derrfuss (University of Nottingham). Here is the full reference including link: Derrfuss, J. (2022). The Hitchhiker's Guide to PSGY 1001. University of Nottingham.
Furthermore, there is extensive documentation on the PsychoPy website:
Additionally, there is a forum: